 Brake Safety Week 2020
Brake Safety Week 2020 is part of the larger safety campaign – CVSA’s Operation Airbrake Program – which will hold two blitz’s. One is the scheduled Brake Safety Week August 23 – 29, 2020 and an unannounced one-day brake safety blitz.
During both the announced and unannounced brake safety enforcement campaigns, CMV inspectors will conduct brake system inspections (primarily Level IV Inspections) on large trucks and buses throughout North America to identify out-of-adjustment brakes and brake-system violations. The week is an annual outreach and enforcement campaign designed to improve commercial vehicle brake safety throughout North America.
Brake Safety
Last year 13.5% of the commercial motor vehicles inspected during 2019 Brake Safety Week were removed from roadways specifically for brake-related vehicle inspection item violations. Inspectors conducted 34,320 commercial motor vehicle inspections as part of the CVSA Brake Safety Week and placed 4,626 vehicles out of service after critical brake-related conditions were identified during roadside inspections. The majority of commercial motor vehicles inspected (86.5%) did not have any critical brake-related inspection item violations.
As always we expect our fleet to operate safely and be in compliance with all regulations at all times.
Safety and compliance is a team effort. If our drivers have safety and compliance questions, feel free to contact John anytime.
Air Brakes
Just as a refresher here is a quick overview of your airbrake system. We’re not going to go in-depth but let’s hit the highlights.
- The heart of your braking system is the air compressor. It supplies the closed air system with pressured air. Air is stored in tanks on your tractor and feeds a tank on your trailer.
- The compressor is controlled by a governor which keeps the system at its normal operating pressure between 100 and 120 PSI.
- Should your air brake system drop below 55 PSI a warning system, consisting of audible and visual light(s), will engage to alert the operator of low air in the system. Parking brake will apply between 20-40 PSI
- Through a system of valves and relays air is sent to the individual brake pods to control the brakes.
- The Parking brake is applied with a high tension spring. To release the parking brake, the air is supplied to one of the chambers in the pod to back off the spring and release the brake. Should the system fail and the system loses its air, the brakes apply as the spring applies the parking brake.
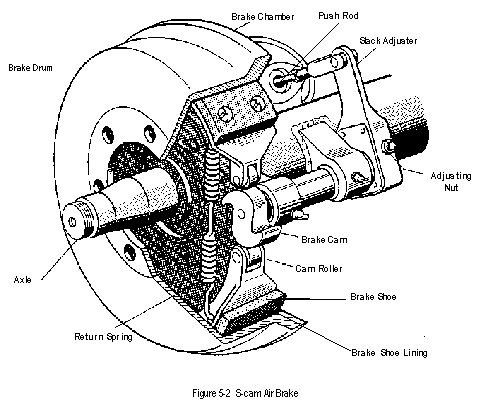
- During normal operation, the air is sent to the individual brakes to slow or stop the vehicle when the vehicle operator presses the brake pedal. Air enters the chamber, the Push Rod travels away from the brake chamber. Referred to as Stroke. The Push Rod is connected to the Slack Adjuster, which connects to and rotates the S Cam and applies the brake.
There’s far more to the system but this is the very basic operation of your brake system.
Test Brakes
When you test your brakes you are testing the whole system. You need to check as part of your pre trip:
Low-air warning device
- Ensure you have air of at least 90 PSI and the ignition is in the ‘On’ position.
- Make brake applications until your low air warnings activate. Warnings should activate at 55 PSI or higher
Air pressure build-up time
- Cut air to your trailer (red valve out)
- Reduce air pressure below 80 PSI
- Maintain 600-900 RPM
- Check the time it takes for the air pressure to rise from 85 PSI to 100 PSI. This time should not exceed two minutes
Air-compressor governor
- Watch the air pressure and note when it ceases to climb (called Cut-Out)
- Reduce air pressure slowly until it begins to climb (called Cut-in)
- Cut-out pressure should not exceed 135 PSI nor be below 100 PSI
- Cut-In pressure should not be less than 80 PSI
Air-loss rate
- Make sure your air pressure is fully charged.
- Turn off your engine
- Release the parking brake and make a full brake application for one minute
- Note the pressure drop (ignore the initial drop from making the application. Start it from where the pressure stabilizes. Keep a consistent pressure)
- A loss should not exceed 2 PSI for a single vehicle or 4 PSI for a two-vehicle combination.
Automatic application of the trailer spring brakes
- Make sure your trailer is being supplied (red valve in)
- Dynamite your trailer brakes (red valve out)
- You should hear the air exit the brake indicating the brakes are set
Spring (parking/emergency) brakes
- Set your parking brakes
- Put the vehicle in gear and add light engine power
- The park brakes should hold the vehicle in place
Air-tank drain valves
Drain the supply tank until it discharges only clean air
Drain the remaining air-tanks
Watch the discharge from the air-tanks and ensure that the drain valves function properly
Checking and Adjusting Brakes and Slack Adjusters
ICBC has a great PDF here with images on how to test your brakes and slack adjusters. Keep in mind modern vehicles have Automatic Slack Adjusters and adjusting them manually is a temporary measure.


